Showing posts with label DIY Art. Show all posts

Friday, March 15, 2013

Hair Bow Organizer

A friend of mine saw this idea and asked me to make one for her niece, who turned 3 last weekend.  Here is the original post from The Idea Room.

So we set off to the craft store to get what we needed.  A picture frame, foam core, batting, fabric & ribbon.  Pretty simple.  (Actually, it wasn't because we went to Michael's, where they don't sell fabric or batting...I had to make a second trip to Hobby Lobby and ended up buying a second frame and she returned the first one...today's lesson?  go to Hobby Lobby first and save yourself time :)


First, cut the foam core to the size of the opening, or ever so slightly smaller (batting is coming and its rather thick!).


Cut a layer or two of batting, a little bigger than the foam core. (I used two layers of the high loft batting - very fluffy!)


Next, cut the fabric to about the same size as the batting.


Begin by stapling one edge of the batting & fabric in place.  This gets tricky with foam core because it doesn't hold staples super firmly, but this is a light duty sort of piece, so just push them into place if necessary and you should be fine.


Next, staple the other side.  There is sort of an art to making this look good.  Too loose, and the fabric will look wrinkly - too tight and the fabric will pull.  Take your time and play with it a little.  As mentioned, the staples are easy to remove, so if you don't get it right the first time, just try again.


Do yourself a favor and clip the corners of the fabric and batting so that there is less bulk to staple through.  I started in the middle of the board and did the corners last.  After everything was tacked in place and looked good, I went back and added a few more staples to make sure everything was secure.


It should look something like this.  Smooth, no wrinkles, no areas pulled too tightly or stretched.  (Although, if its not perfect, don't sweat it.  You're going to add ribbon, frame and bows.  It will hide a lot of your mistakes.


Staple ribbon vertically across the board.  You OCD perfectionists should measure (like I did), otherwise just eyeball it until it looks good.


Place it in the frame and staple it in place.  Be careful and staple at sort of an angle so the staples go into the frame, and not through the front.


Because this was a gift, I wanted to cover up all the messiness.  Had I realized that I wanted to do this when I was buying supplies, I would have bought some felt the size of the whole frame.  It was a last minute decision, so I used poster board.  And because the picture frame had pre-attached hangers, I just put it on the inside part, leaving those exposed.  (It would look better to take the felt to the edges of the frame, glue instead of staple and put the hangers over the felt...oh well, yours will look better than mine on the back...where no one sees it.)


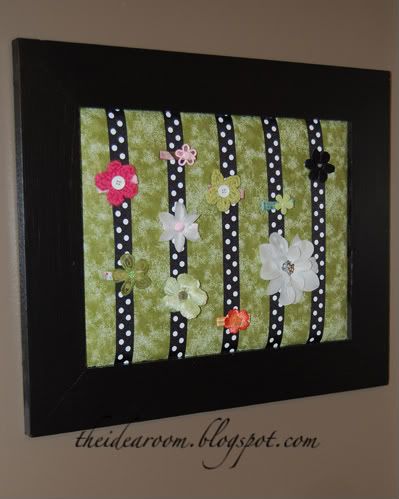
Tada!  The finished product...Soooo cute!  Complete with her two hair bows :).  (She only recently got to the point where she had enough hair to use bows...so her collection is small...I'm sure it will grow now that she has so much space to store them!)


A little dark, but here is Princess Madeline and her new bow organizer!


Comment below to let me know what you think and/or if you try this for yourself!  And don't forget to "follow" us on blogger on the right side of the page.

Grace and love,
Jenn


Monday, February 11, 2013

Redecorating 2013 - DIY Stenciling

The next project for my master bedroom was to paint a single strip of stenciling on one of the walls...an idea I found on pinterest from My Sister & I, Inc.


So I started looking for a stencil that would work with the other patterns going on in the room.  But it turns out, stencils (especially the large patterns like this one) are expensive!  Most of the ones I found were between $40-90!  If I were doing the whole wall, that expense might be justifiable, but when you're unemployed and only painting a small amount of the stencil...nope, not happening.

Instead, I borrowed a trick I had just learned from making the Subway Art for the other wall in the room.  I found a picture of a pattern that I liked, and enlarged it with an "engineering print" from Staples.  It only cost $2 for the print!


In the interest of full disclosure, this is probably not a "beginner" project, nor is it a good project for a perfectionist. BUT, if you want to add an accent like this, need to save some money and have some time to kill (probably 4-5 hours) - the effect is amazing!

I forgot to take a picture, but there are a couple of options for transferring the outline of the image to the wall.  You could use an overhead projector (assuming you have access to one), but I'd be concerned about the pattern getting distorted.  Any form of tracing paper or carbon paper will work.  But, of course, I didn't have any of these, so I went old school.  I used a piece of charcoal (you could also use a pencil, but it would take a long time) to color all over the pack of the sheet of paper.  Then, when I put it on the wall and traced over the pattern, the charcoal transferred the pattern to the wall.


Once you've traced the pattern, move the paper and realign it so you can continue the pattern.  You'll see that the pattern is designed as an all over pattern, so I had to select the portion that I wanted to use and only trace that.


 Hard to photograph, but this is what it looked like once I was finished tracing the pattern.


Next, using an artist's brush, fill in the pattern with paint.  I used a 1/2" angled brush and it worked perfectly!  This part is the reason that beginners and perfectionists should spend the money on a stencil.  You need a very steady hand, and even still, when you look up close, the lines aren't perfectly crisp like they would be with a stencil.  From just a couple of feet away though, you can hardly tell that its not perfect.


The finished product!  I liked this pattern because it's a softer version of the print on my bed.  Eventually, I'm going to mount a long mirror over this, but who knows when I'll get around to that.

Total Project Cost

"Engineering Print" from Staples             $2
Paint (left over from another project)    FREE 
Paint Brush                                        $3
Total                                                $5

Take that $50 stencil!

For a more subtle look, you could use polycrylic, or the same color paint in a different finish (gloss paint on a matte wall).  The effect would be beautiful!

Post your comments to let me know what you think and/or if you try this for yourself.

Grace and love,
Jenn


Tuesday, February 5, 2013

Redecorating 2013 - Jewelry Organization

My next project in this series was for my Master Bedroom.  When I started to bring everything back in to the room after painting, I was really appreciating how clean and uncluttered everything was.  The problem was, the bedroom was clean and uncluttered, the dining room was a different story...all my junk was still in there.  So I started clearing some things out and decided I didn't want my jewelry on top of my dresser anymore.  Here's what it looked like before...


Not the worst system ever, and also the cleanest my dresser has EVER looked...I always end up piling other things there too.  Also, my necklaces often got tangled and taking the earrings off that rack was annoying because it was hard to reach around and put the backs off them.  So I scoured the internet for some ideas.  I found this idea on Where Beauty Meets Functions.


So, I set off to Hobby Lobby and Lowe's to see how I could recreate this idea.  Here's what I bought...


3 open pictures frames (2-9x12, 1 12x24), A roll of cork, Foam core, fabric, galvanized steel wire, eyelet screws, picture hangers (for the back of the frame, because they weren't included).  You'll also need tools like a staple gun, wire cutters, pliers and a utility knife.

First, I cut the foam core to the size of the frame, and cut sheets of cork to match. 


Then I stapled the cork onto the foam core (I just needed an office stapler for this) and trimmed everything to size (cork is stretchy, so you'll probably have to trim it).  I tried gluing it, but it wasn't working...so I switched to stapling.


You could skip the fabric step and just put it in the frame this way, if you like this look.  If you do, be careful of where you staple, they might show (mine did).


I had planned to cover the cork in fabric to go with my bedroom color scheme.  So I cut the fabric so I could wrap it around the cork/foam core.


Do yourself a favor and clip the corners so you have less bulk to wrap.


Again, I used an office stapler to secure it in place.


One of the 3 holders was going to be used for earrings, so I attached the wire and eyelet screws so the earrings could hang on them.  Skip this step for the other frames.


Some tips, attach the eyelets on both sides then thread the wire through and pull it as tightly as possible and secure it.  Then, to get it tighter, try turn the eyelets tighter to increase the tension.

Next place the fabric wrapped foam core in the back and secure with a staple gun.  Be careful that you don't staple all the way through the frame!


Next, attach the sawtooth hangers to the back of the frame (if necessary).


And...tada!  Repeat process for the other frames, minus the wire.


And here's what I ended up with!  To attach necklaces, I just used straight pins.  I used plain ones, but at some point I might upgrade to the ones with the pearl balls on the end.  For a more fun, colorful look you could use the ones with the colored balls.


And here is how it looked once I put all of my jewelry on it.  The necklace boards are a little more crowded than I anticipated (turns out I have a LOT of jewelry), but I still like it.  And, I love that things don't get tangled, its easy to remove and rehang everything and I can see everything at once.


The only downside to this system for earrings is that it won't hold anything with a post back.  So those are all in my jewelry box.


Total cost of project.

Open Back Frames          $49
Foam Core                      FREE (already had it)
Cork                               $11 (with lots left over for another project)
Fabric                             $4
Wire & Hardware           $5   
Total                               $69

The frames really upped the cost of this project.  If you wanted a more vintage or eclectic feel, you could probably hunt up some thrift store frames and save a little money.  That look wouldn't have worked in this space, so I spent a little more.  But I really love it, so its worth the extra cost to me!

Be sure and comment to let me know what you think or if you make something like this for yourself...I'd love to see it!

Grace and love,
Jenn

Saturday, February 2, 2013

Redecorating 2013 - Subway Art

Because I am between jobs right now, I'm using this time to do some projects around my house.  Things I never seem to make time for when I'm working.  So this series will include a variety of DIY projects that I completed for my Master Bedroom, Dining Room, Living Room & Kitchen.  The house is really starting to come together!

Up first is two different DIY Subway Art projects I did, one for the Master Bedroom, one for the Living Room.  The first one, for the Master Bedroom, was surprisingly easy and designed at 3 am one night when I inadvertently drank coffee too late in the day!  The idea came from Withywindle.


Traditional Subway Art is usually a list of places, often ones that have some meaning for you.  I decided to take the concept and use a Bible verse that has a lot of meaning for me.  I did the formatting in Microsoft Word, which limits the design capability, but because I'm familiar with the program and already have it, it was the best option for me.  I made a custom size page that was 12 x 18, so that it would easily expand to a 24 x 36 when I sent it to Staples.


Staples charges about $25-30 for poster prints, but black and white "engineering prints" are about $4 for a 24x36 sheet!  It's a simple process to upload a pdf to the staples copy & print site and send it to them for printing.  After I picked it up, I spray glued it to a piece of foam core.  Simple. Easy. Cheap!

Cost of Project.
Print from Staples             $4
Foam Core                      $8 (7 for the board, 1 for them to cut it)
Total                                $12

Project #2 was for my living room and was a little more involved.  The idea came from A Beautiful Mess.


The suggestion was to use an old painting from a thrift store as the background.  So I set off to a couple of thrift stores, but couldn't find a painting.  I found a few on craigslist, but they were upwards of $50...a lot to pay for something you're going to paint over.  So my twist on the idea was to use a jigsaw puzzle!  Puzzles are one of our favorite family activities, especially in the winter, so I had a lot to choose from.

I forgot to take pictures of the first steps, but I think you can figure out how to put the puzzle together, and then glue it together (I used mod podge).  I glued it directly to the back piece of cardboard from the frame I planned to use.

Then I cut out letters from vinyl using my Cricut and laid them out on top of the puzzle.  Go ahead and draw some lines to make sure the words go across straight...they won't be visible when you're done.


When you have it laid out, make sure the vinyl letters are sealed on the edges to prevent bleeding - it won't be 100% effective, but you want to prevent as much as possible.  Then paint over the the entire surface.  I used spray paint, but acrylic would probably work better.  The letters curled and the spray paint bled.


Once the paint is dry, peel off the vinyl letters.  You may need to use an exacto knife or razor blade to keep the paint from coming off where you don't want it to, or to get the letters up off the picture.


Frame and hang!  (I decided that the paint color I spray painted was too dark, there wasn't enough contrast between the puzzle and the paint, making it hard to read.  So I actually went over it again with some latex paint and a brush...it was a pain, but the result was pretty good.  The moral of the story is to choose your paint color carefully....)


Cost of Project
Puzzle                      FREE (already had it)
Frame                      $23 (Clearance at Michael's!)
Vinyl for letters        FREE (already had it - it'll run you about $10 at Hobby Lobby)
Spray Paint              $4
Total Cost               $27

Comment and let me know what you think or if you try one of these for yourself!

Grace and love,
Jenn