Monday, February 18, 2013

Kitchen Traditions - Grandma's brownies

This series will feature many of our favorite family recipes from our mom, grandmas and aunts.  The beauty of this series is we don't have to credit any other internet sources for our ideas, these are as good as original as we're going to get.  The downside is that some of these recipes aren't actually original, but we don't know really know where they originated.  Case in point, as we were brainstorming a list of recipes, I suggested my mom's cheesecake recipe, which is one of my favorites.  Ditder quickly pointed out that its the same recipe printed inside every box of Philadelphia cream cheese.......who knew??  So if we infringe on any copyrights, we're sorry.  It will have been an honest mistake.

Up first is a recipe from our Grandma Carper, our mom's mom.  I was 10 when she died, so my perception may be a little warped, but I remember her as the epitome of fashion and style.  All of my fashion genes were passed directly from her, and she is also where I get my love of shopping, shoes & coats (hate wearing them, love buying them!).  The picture below was taken about a month before she died, on a vacation to Orlando. The dress and shoes I'm wearing were hers, but I remember feeling so grown up and sophisticated in that outfit.  A fun fact, my Grandma wore a 7 1/2 shoe...at 10, I was wearing a size 10 (and my feet were not done growing :/ ).  I wore the shoes despite how much they hurt my feet!

I had this picture in mind while writing this post, but when I actually found it, I realized it's not a 
great picture of her (and I'm in about 4th grade here, so no good pictures exist).  Oh well,
 I'll be sure to post a better picture of her in another post.  I still love the story it tells :)
These brownies are great because the ingredients are simple and I always have them on hand.  It's a simple recipe that is easy to throw together last minute, and also serves as an excellent base for many different brownie desserts (Brownie pizzas for example).  Eat them plain or frost them...either way they are delicious. I should note, though, that this is more of a "cake" brownie, not a "fudge" brownie.  So keep that in mind.

Like I said, simple ingredients...Butter, cocoa powder, flour, sugar, eggs & salt.


First, preheat your oven to 350°.  No seriously, go do it now.  I always forget which slows down the baking process an extra 10-15 minutes.

In a small saucepan, melt the butter.  One great thing about this recipe is that the butter does not have to be thawed.  If you have it stored in the freezer, just take it out and throw it in the pan!


Once it has melted, add the cocoa powder and stir it together.  Set the mixture aside.


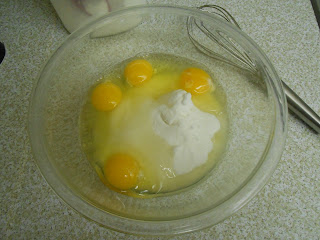
In a medium-large bowl, cream together eggs and sugar.  You could use an electric hand mixer for this or just a whisk.  It's not a labor intensive process, so I usually go for the whisk (especially when the beaters for the mixer are in the dishwasher, which mine were :)


Add the flour and salt and mix together.


Carefully beat in the chocolate/butter mixture.  This can get a little messy if you aren't careful.  I also like to use a glass bowl for this so I make sure the chocolate is mixed all the way through the batter.


Mmmm...yummy!  This is the hardest part of this recipe.  You have to get the batter from the bowl, to the pan, without eating it all first.  Good luck to you!


Pour it into a greased pan.  The recipe says 9x13, but it depends on what you want to use it for.  If I'm just making plain or frosted brownies, I prefer a smaller pan so that they are thicker.  But, if you want to add other deliciousness on top of it, you might want them thinner.  You could also use muffin or mini muffin pans (just be sure to adjust the baking time).

Bake for 40 minutes (or until toothpick inserted in center comes out clean).


The finished result!  Remove from the oven and let them cool.  (Oh, who am I kidding?  Eat them straight out of the oven and burn your friggin' mouth off - like I did!)


Comment and let me know what you think and/or if you try these yourself!

Grace and love,
Jenn


Friday, February 15, 2013

2013 Redecorating - Fixing Floppy Pillow Flange

As part of my redecorating project, I bought new bedding.  The set came with a duvet cover and 2 standard pillow shams.  Generally speaking, pillow shams are of the devil.  No, seriously...I don't like them.  I prefer pre-made pillows.  Why?  Because you can never get inserts for pillow shams that actually fit.  It seems like in the day and age of EVERYTHING being standardized, they would be able to get this one thing right.  But, no.  So my choices were to stuff the shams in a closet and buy something else, or make them work.  And, being generally cheap and at the time unemployed (I did recently start a new job...yay!!), I channeled my inner Tim Gunn and made them work.

First, I stuffed them with two pillow inserts, instead of one.  It makes them slightly awkwardly shaped, but workable and not looking sad and pathetic.  However, the flange on the pillows was still not good.  Sometimes I wish my style were less contemporary and a little more traditional, because one way to avoid this problem is to use a ruffle instead of a flange.  But ruffles would have looked ridiculous on this bedding set, so I'm stuck with a flange.  Here's how I made it work...


First, I ripped out the stitching that created the flange with a seam ripper.  This is very easy to do because the only thing creating the flange is a row of running stitches.


Then I flipped the sham inside out and ironed it so it would be flat.


The flange on these shams was about 1 3/4" so I cut a 2 1/2" wide strip of buckrum.  I cut it so it was about 1/4" shorter than the length of the seam (you will see why later).  Buckrum is a stiffener often used to make curtains.  You can find it at JoAnn's for about $5 yard.  A yard was more than enough for both shams.  I pinned it in place so that the outer edge was along the seam (not the raw edge, you want it to lay flat, not be folded over when you invert the sham).


I had to redo this about 3 times because I kept messing it up.  So here's what I learned (the hard way).  First, pin on the front of the sham, not the back (where the overlap is).  Second, pin along the outer edge first.  At this point, it's okay if you go through both layers of fabric.


Next, put something hard that you can't push a pin into inside the pillow sham (I used a random piece of plexi-glas I had laying around).  Then using the plexi-glas as a barrier, pin along the inside of the buckrum, but only go through the front layer of fabric.  Why?  Because you're going to sew from the outside, so you can't have pins along the outer edge, or you'll never get them back out.  And if your pins go through both layers of fabric, you won't be able to invert it.
 

Once you've pinned the buckrum in place, invert the pillow case.  You will need to fuss with it a little to get it back in place (because its only pinned on one side).  This is also why you need it a little shorter than the length.  If it is even slightly longer than the inside length, it will not fit inside the sham and lay flat.  (Yet another thing I had to do twice...)  Once its in place and flat, iron your seams so they are smooth.


You may need to pin the corners together (from the outside) so it doesn't move.


Finally, using a matching thread, restitch the flange.  You should be able to see the needle holes from the original stitching, so use that as a guide.  You should notice that the buckrum now fills the entire flange, and extends into the body of the pillow about 3/4".  This is critical!  If the buckrum were only the width of the flange, it would not help it stand up, it would be stiff, but still falling over.


The finished product...Flange that stands up nicely!

Total cost of project

Shams                    part of the $40 bedding set I bought...not counting it in project cost.
Buckrum                $4 (it was on sale!)
Thread                   $2
Total                      $6

Let me know what you think and/or if you try this project for yourself!

Grace and love,
Jenn


Thursday, February 14, 2013

DIY Drawer Organizer

Followers of my other blog may recognize this project, but I thought I should post it to this blog as well so all of little ditders friends can see it too!

One of my biggest goals for this year is to get my house organized.  It seems I've been moving from house to house for 6 years, never staying in one place long enough to get truly unpacked and organized and I'm tired of living out of boxes. 

I found a cleaning agenda on the Internet (sorry I can't find the blog now) that helps you get/keep your house clean, even deep cleaned, by doing a small project every day... Here's a synopsis of the agenda.  The actual print out has more detail. Let me know if you would like a copy and I can email it to you (I downloaded it from the blog).

Monday -  Laundry Day (This doesn't work for me, I have to do laundry every day)
                 Tidy the House
                 Vacuum main room (I sweep as I have hardwood floors)

Tuesday - Bathrooms

Wednesday - Surfaces (dusting, wiping things down etc)

Thursday - Organize/Clean out something. 

Friday - Tidy the house
              Vacuum all rooms including stairs.

This seems to work pretty well, I've only been doing it for a couple of weeks and don't hit it all every week, but at least I have a goal.  Now, back to organization.  Last Thursday I started an organization project that has taken me all week to complete (mainly due to my work schedule and other obligations), but I finished it this evening and I want to share it with you.  Not only is it something everyone can probably utilize somewhere, it is very inexpensive too!

Now, this is not the first time I've used this concept, (I will show you some other examples at the end) but it is the first time I've utilized it to this extent...  You see I have this kitchen drawer; it is huge 28" wide by 20" deep.  You can't find organizers for something that size, which makes it impossible to find the utensil you need when you need it.


I was discussing the problem with my 8 year old, running an idea by him that I had come up with. A quite complicated idea that involved buying wood and building a divider.  He said "Mom, why don't you just use boxes like you did for my desk?" Thank goodness children think simply. I couldn't believe I didn't think of that myself!  So I dug through the pantry and searched the house for boxes, and even found a box at work that would work for some of the bigger items.


I placed each box in the drawer and drew lines around it with a sharpie.  (Please excuse the dye mark on my hand, I had been helping my husband in the shop that day).


Next, using a box cutter (you could also use a Stanley knife) I cut along the lines.


Then I test fit the boxes in the drawer and went looking for more boxes to fill in the holes.


In most cases you can stop at this point, but since this is a heavily used kitchen drawer, I decided it needed a little more attention. So I wrapped each box in contact paper. This step will make the boxes sturdier and make it easy to wipe them out and keep the drawer clean. If you are planning to cover your boxes in contact paper, I highly recommend and abstract pattern, I used the "granite" pattern and it worked great because I didn't have to worry about lining things up and could patch any mistakes with scraps. It took two 9 foot rolls of contact paper to complete this project. That was the only expense.


Viola! The finished project.  Now, I said I've done this before, The following drawers need a little attention as they haven't been redone since the last move and some of the boxes are missing. 


Dominic's desk is actually a computer desk without a drawer, we utilized boxes on the keyboard tray to make cubbies for all his school supplies.


We also have a hutch that has been utilized as a catch-all and TV stand in the past but now holds the vivarium for Dominic's bearded dragon, Dexter. In the past this drawer held mostly batteries and candles, and I'm thinking the batteries will again call this drawer home once I begin to organize the drawers in the laundry room.

I hope you found this idea helpful.  Stay tuned to follow me on more organizational adventures as I work toward my whole house organization goal this year! 

Love and God's peace to you,
Christine


Monday, February 11, 2013

Redecorating 2013 - DIY Stenciling

The next project for my master bedroom was to paint a single strip of stenciling on one of the walls...an idea I found on pinterest from My Sister & I, Inc.


So I started looking for a stencil that would work with the other patterns going on in the room.  But it turns out, stencils (especially the large patterns like this one) are expensive!  Most of the ones I found were between $40-90!  If I were doing the whole wall, that expense might be justifiable, but when you're unemployed and only painting a small amount of the stencil...nope, not happening.

Instead, I borrowed a trick I had just learned from making the Subway Art for the other wall in the room.  I found a picture of a pattern that I liked, and enlarged it with an "engineering print" from Staples.  It only cost $2 for the print!


In the interest of full disclosure, this is probably not a "beginner" project, nor is it a good project for a perfectionist. BUT, if you want to add an accent like this, need to save some money and have some time to kill (probably 4-5 hours) - the effect is amazing!

I forgot to take a picture, but there are a couple of options for transferring the outline of the image to the wall.  You could use an overhead projector (assuming you have access to one), but I'd be concerned about the pattern getting distorted.  Any form of tracing paper or carbon paper will work.  But, of course, I didn't have any of these, so I went old school.  I used a piece of charcoal (you could also use a pencil, but it would take a long time) to color all over the pack of the sheet of paper.  Then, when I put it on the wall and traced over the pattern, the charcoal transferred the pattern to the wall.


Once you've traced the pattern, move the paper and realign it so you can continue the pattern.  You'll see that the pattern is designed as an all over pattern, so I had to select the portion that I wanted to use and only trace that.


 Hard to photograph, but this is what it looked like once I was finished tracing the pattern.


Next, using an artist's brush, fill in the pattern with paint.  I used a 1/2" angled brush and it worked perfectly!  This part is the reason that beginners and perfectionists should spend the money on a stencil.  You need a very steady hand, and even still, when you look up close, the lines aren't perfectly crisp like they would be with a stencil.  From just a couple of feet away though, you can hardly tell that its not perfect.


The finished product!  I liked this pattern because it's a softer version of the print on my bed.  Eventually, I'm going to mount a long mirror over this, but who knows when I'll get around to that.

Total Project Cost

"Engineering Print" from Staples             $2
Paint (left over from another project)    FREE 
Paint Brush                                        $3
Total                                                $5

Take that $50 stencil!

For a more subtle look, you could use polycrylic, or the same color paint in a different finish (gloss paint on a matte wall).  The effect would be beautiful!

Post your comments to let me know what you think and/or if you try this for yourself.

Grace and love,
Jenn


Friday, February 8, 2013

Redecorating 2013 - How to update laminate countertops

My house has the most hideous counter tops you have seen...No, seriously...they're really awful.  I don't even know why they make laminate in this color.  When we first moved in, I toyed with a lot of ideas about how I could disguise them - unattached ceramic tiles , paint, just never walking into the kitchen...and finally found the idea of using Contact Paper.  It was 3 years ago, so I have no idea where I found the idea, but I'm sure it was the result of a Google search.

Since then, I have had to redo them about once a year.  It costs less than $10 and takes about 2 hours - not bad!  This year, I had to redo the whole thing (usually I just do the flat surfaces, and leave the back splash) because they discontinued the color I was using.  So you get to see the process from start to finish.  First, a few before pictures...


Why?  Just Why?


This side is even worse because of the matching back splash...

So for this project I needed contact paper, scissors, a utility knife and something to smooth out the paper.  I use my Pampered Chef Handy Scraper because of the rubber edge, but a piece of stiff cardboard will do the same thing.

First, cut the Contact paper into pieces that are big enough to cover from the back over the front edge of the counter top with plenty of extra (1-2").  Then, starting on one end, peel off the backing and lay the first sheet as straight as possible.  If the end of the counter is exposed, make sure you can cover that edge as well.  It's a big piece of paper to work with, so I only peel off 6-8" of the backing paper so that it doesn't get stuck together.  Use your scraper (or cardboard) to press it into place and remove any bubbles.  Start from the middle and work towards the edges.


Slowly peel off the backing paper as you press the paper into place, until the whole sheet is stuck down and bubble free.


Then take your *sharp* utility knife and trim along the edges.  Be careful so you don't cut off areas you wanted to cover.  On the corners, you will need to cut along the edges so you can overlap the pieces.


Then go on to the next piece.  You will want to lay it carefully, and may need to re-position it a couple of times to get it right.  You'll want a small overlap, probably less than 1/4".  Then continue as you did with the first one until the whole section is covered.


Take extra care around the sink to make sure it fits well.  I also do extra overlap because of the extra water that always seems to be on the counter.  I don't have many problems with it peeling, but just be extra careful.


So much better looking once its done!


Contact paper will hold up with light to medium use.  Always use cutting boards as it can be cut easily, even with dull knives.  I find that the surface holds up for about a year (I usually replace it after canning season, which is when it gets the most damaged - I was a little behind this year!)  This is only the second time I've done the back splash (It lasted 3 years), and if I hadn't been changing colors I wouldn't have changed it...it easily could have lasted a few more years.


Total cost of project

Contact Paper (2 rolls)                        $12
Tools                                                  Already had

Total                                                   $12

Comment and let me know what you think and also let me know if you try this for yourself!

Grace and love,
Jenn

Wednesday, February 6, 2013

DIY disinfecting wipes

I have been using homemade disinfecting wipes for about a year now... and as is usually the case after you  start something new, you hear many reasons why what you are doing is wrong... In this case, an article surfaced as to why you should not combine Castile soap with vinegar (the acid of the vinegar and the base of the soap negate each other) So after consulting a few other blogs, I came up with my own recipe.

I am going to include my complete directions below, but I am crediting the originating blogs here...  I  used the paper towel idea from  Home Made Baby Wipes from the White House Black Shutters Blog  and was directed to my original disinfecting wipe recipe (using Castile soap and vinegar) via One Good Thing By Jillee - Homemade disinfecting wipes  (original recipe via LiveRenewed.com). Originally, I was not interested in the whole going paperless thing, but,  from a purely frugal standpoint, I was quickly won over after reading this blog post by Jillee - Throwing in the Towel. I have included the instructions for using paper towels (disposable wipes) and using cloth (reusable) wipes below. 

The original recipe is no longer online so I can't even link to it or remember it correclty, but it basically had vinegar, water, Castile soap and tea tree oil. So without further ado.... here are some recipes for the disinfecting solution....

Live Renewed Disinfecting Wipes Recipe #1
  • 1 cup water
  • 2 Tbsp vinegar
  • 1/2 Tbsp Natural Dish Soap
  • 8-10 drops lemon essential oil
The vinegar and lemon have disinfecting properties and the lemon also gives it a pleasant scent. The dish soap is for extra cleaning power. The combined scent of the dish soap and lemon essential oil smells really fresh and clean, and covers up any smell of the vinegar in this recipe.

Live Renewed Disinfecting Wipes Recipe #2
  • 1 cup water
  • 2 Tbsp Castile soap
  • 8-10 drops tea tree oil
The Castile soap is a vegetable based soap (cleanser) and the Tea Tree Oil is a natural oil with antiviral, antibacterial, antifungal and antiseptic properties.
Christine's Disinfecting Wipes Recipe
  • 1 cup water
  • 2 Tbs vinegar
  • 8-10 drops tea tree oil
I prefer to clean with vinegar, and while I don't find the scent of vinegar bothersome, the tea tree oil does have a fragrance that dilutes the scent of the vinegar.   Basically, I have adapted recipe #1, but since I have castille soap on hand, I may also make some of recipe #2 just to compare... I'll keep you posted....

Here are some pics and directions from the first time I made the "original" recipe... I basically want you to see how the paper towel thing works to make disposable wipes...

Assemble and combine ingredients.  Push a full roll of paper towels into an empty disinfecting wipes container. Then, using a funnel, pour your solution down the center of the paper towel tube.


 As the paper towels begin to absorb the solution you can push the towels completely into the container, let it sit awhile and then you can pull the tube out from the middle of the paper towel roll. You will then be able to pull the first paper towel up from the center of the roll.


Put the lid on the container and voila! Your homemade, disposable disinfecting wipes. 


Reusable Wipes

Start by purchasing a pack of flour sack towels (about 6.00 at Wal-Mart).  Cut the towels into 4 to 6  pieces, depending on the size of the wipes you prefer... you can hem the edges if desired, or just leave them raw - completely up to you. Since I am continuing to reuse my old "Clorox" wipes container, I have rolled my towels so that they overlap slightly.  Hopefully when I pull one, the next one pulls up.... Line them up with the overlap, then roll them up and pull the inside towel up to use as your first towel.


 Pour the solution into your container and add your towels...


And voila!  My reusable disinfecting wipes!  Now I have to go clean my bathroom...Until next time...

Love and God's peace to you,
Christine